
Australia
Call us
7 days
Bulk SMS Marketing - SMS Reminders - SMS API Integration
Australian owned & operated since 2014
SMS Everyone for Make
Connect SMS to over 2000 apps with our Make SMS App!

With our Make SMS sender, you can easily connect SMS to thousands of applications.
For example, you could send an SMS to a client every time you generate an invoice in Xero.
You can personalise the SMS with any data that the 'trigger' module provides. eg Client's first name, Account ID, email, invoice number, totals, the URL of attachments etc etc.
Below is some basic instructions on how to connect an app to SMS Everyone in Make.
BEFORE YOU BEGIN
Please note: the information below was correct and the module tested perfectly at the time this article was written. If you have trouble or notice anything different, please contact us and let us know.
This does require some basic knowledge of APIs and specifically JSON.
Connecting the SMS Everyone 'Send SMS' module to your app in Make
STEP 1 - SIGN UP FOR SMS EVERYONE
Before you can test our Make module, you'll need an SMS Everyone account. So please sign up via the FREE TRIAL button below.
Please mention in our sign-up form that you require the account to integrate with "Make"
We'll give you a username, password and an Originator (the number/word that the message will come from) to enter into the Make app.
Plus we'll give you 100 free credits to get you started.
STEP 2 - CREATE THE 'TRIGGER' THAT YOU WANT TO CONNECT SMS TO
Log in to your Make account.
Go to Scenarios (on the left menu)
Click "Create a new scenario" button (top right)
In the scenario you created, you will need some trigger event in your App/Software that will tell us to send an SMS to a certain person.
In this example below, we're going to use Google Calendar.
Let's say that you want to receive an SMS every time an appointment is created in your Google Calendar.
You might be a salesperson and an appointment booker is booking appointments for you. They're adding them to your calendar and you want an SMS alert every time this happens.
This is an easy one to test as you can simply add a new appointment, then manually run the scenario once and you'll know if its working straight away.
You would select Google Calendar as the trigger module.
In our example we will select 'Watch Events' as the 'event'
Connection
Next you would need to connect your Google account by entering your Google username and password.
This will store your Google credentials under "Connection" at the top of the Google Calendar app.
Calendar
Next is the Calendar to select. Pull the dropdown box and select the primary calendar
Watch Events
Set this to 'By Created Date'
Show deleted events
Select 'No'
Query
Leave this blank unless to want to filter by a certain word/phrase etc.
Event Types
Select all.
Limit
Leave this at 2
Then click OK
Next, go to your google calendar and create an event/appointment in the future. eg set it for tomorrow.
Below is the Google Calendar App in Make with all the settings filled:

Next click on 'Run Once' down the bottom left to ensure that the Calendar app can find some data.
If successful, it will show "Google Calendar" in green and you can see up the top right of the google calendar icon a little thought bubble which shows the result. If you click on that you'll see a whole bunch of output parameters for the event/s it found (max of 2)

STEP 3 - ADD THE SMS EVERYONE MODULE
Once you've completed the Trigger module (or the module right before where you want to send an SMS) click on the little semi-circle to the right of the Calendar app to add the SMS Everyone module. You'll see when you hover your mouse over it that it says "Add another Module"
In the search box, type 'SMS Everyone'
You'll see our name in the results and three modules to choose from:

Select the "Send SMS" module.
Connection
Like you did with the Google Calendar module, you'll need to create a connection.
Click 'Create Connection' then enter your username and password that we gave you when you signed up
This will create a 'connection' to your SMS Everyone account in the 'connection' area at the top of the module settings.

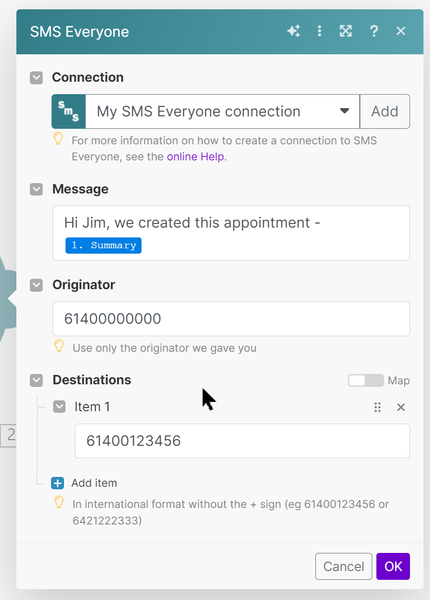
STEP 4 - THE 3 REQUIRED FIELDS
Message
Type in your message that you want to send.
You can insert variables from the trigger output by dragging them into the Message field and it will put them wherever your cursor is. In the below example, we dragged in the 'Summary' field which will show the appointment details in the message

Originator
In the originator field, type in the originator exactly as we gave it to you when you signed up.
Destinations
Next configure the destination/s you want to send to. This is the mobile number/s of the recipients. You can send to one or many recipients.
Click the "+ Add item" button under Destinations
If you want to send all messages to one fixed mobile number that never changes, enter that number in international format without the + sign in the item 1 box.
eg 61400123456
If you want to send to a different number each time and your trigger module gives the recipient's mobile number in its data output, drag that mobile phone field into this box. This way each message goes to the recipient that is produced by the trigger app.
Note: Google calendar does not have a mobile number field so the above example is just a guess of what your app might offer.
If you want to add multiple recipients, click the "+ Add item" button down the bottom to add multiple fixed numbers and/or variable fields
Once you have entered all 3 fields above, click OK.
STEP 5 - SEND A TEST
Click the 'Run Once' button down the bottom left of the screen.
You should see both modules go green with ticks like this:

What if I get an error?
If you don't get a successful result, have a look at the bottom right of the screen and there should be an error generated by SMS Everyone. You'll also see the error info if you click on the little thought bubble at top right of the module. Examples:
Campaign originator invalid. You must send from a registered origin. Error Code -131
This means that you've tried to send from an originator that is not registered with SMS Everyone.
No valid destination number(s) specified. Code -111
This means that your destination number/s are invalid or missing.
Note: DO NOT CLICK ON 'IGNORE ALL ERRORS' OR 'IGNORE ALL ERRORS OF TYPE RUNTIMEERROR'
The system must handle our errors correctly or it will stop working.
This is showing the error in the log down bottom right in red

This is showing the error by clicking the thought bubble on the module

Fix all errors so that both modules go green before you proceed.
If you cant fix the error, contact us
STEP 6 - DEPLOY
Once you have successfully tested the app, click the back button at the top left of the screen (not your browser's back button) or click on scenarios on the left.
Then to the right of your scenario you just created, turn it on.

Once you've deployed the workflow, be sure to test the full thing end to end by getting your software to fire a trigger. In the case above, we simply create a new Google calendar appointment and within 5 minutes, we receive an SMS.
NEED HELP?
Did something not go as planned? Get in touch and we should be able to help you with whatever you need.
Connecting the 'Receive SMS' module
Make allows you to receive SMS messages to your software.
It will check our servers every 15 minutes or so for any new replies since it last checked.
Make is clever enough to be able to receive multiple replies at once (if there are multiple replies waiting on our servers to be retrieved) and forward them one by one to your software.
Important things to note about this example integration:
We only provide the end user's mobile number, message text and the virtual number of ours that they sent the message to. This may not be compatible with many apps that require an ID for the contact/user/person that you are updating.
For example, CRM's like Zoho require a Contact ID to update a contact with some info. We do not supply this field.
However, for example you could make your own SMS to email service (We provide this service already of course) using your own email provider like Microsoft office as this type of integration does not require any specific fields other than the originator of the message, the message text and the recipient of the message (ie our virtual mobile number)
Lets try this example so you can see how our replies module works.
STEP 1 - SET SMS EVERYONE 'SMS REPLIES' AS THE TRIGGER
Start a new scenario like you did in the 'Connecting the Send SMS' module above
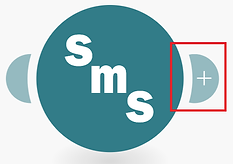
Click the big + sign to add our module first:

Type 'SMS Everyone' in the search box and select the 'Receive SMS' module.
Create your connection to SMS Everyone by typing in your username and password as we gave it to you when you signed up.
No other fields are required.
STEP 2 - CONNECT YOUR SOFTWARE (MODULE)
Next, select the software that you want to forward replies to.
In our example, we are forwarding them to Microsoft 365 email so search for 'Microsoft 365 email' and then select 'create and send a message'

Connection
Enter your Microsoft 365 username and password credentials to set up the connection. Once you are connected, lets look at the additional required fields.
Subject
Give your email a subject. For example you could make it say "SMS from [mobile number]. To do this type 'SMS from ' then drag in the 'Originator' field from the SMS Everyone module..
Body Content
In the body of the email, type or drag in the fields that you want. Youll obviously want the messsage text and the originator fields at least.
Importance
Set the importance of the email as preferred.
To Recipients
Enter the recipients you would like to receive this email.
From
Enter the registered email address and Name of the email account you have with Microsoft. (or the alias you're allowed to send from)
The Reply To and Attachments fields can be left empty.
Click OK

STEP 3 - ADD A FILTER TO STOP EMPTY EMAILS
This step is to prevent you from receiving blank emails if there are no SMS replies received when Make checks our servers.
In between the 2 modules are 3 dots. Click the middle one.

You'll get a pop up box to set up a filter.
Label
Give the filter a name. We called it "if there are replies"
Condition
Click in the Condition field and select 'Total number of bundles' from the SMS Everyone module. Drag it in to the field.

Below the condition field is a drop down box. Pull it down and scroll all the way down to 'Numeric Operators' and select 'Greater than'
Then in the field below that type 0 (zero)
What this is telling Make to do is only proceed if the total number of bundles is greater than 0.
It should look like this below:

If so, click OK.
STEP 3 - TEST
Click 'Run Once' down the bottom left.
If there are no replies on our server:
The SMS Everyone module will go green.
The filter in the middle will show 0
Microsoft 365 Email will stay black as the filter stopped the scenario from getting to that point.
This is a good result as you don't want an email if there are no replies..

If there are replies on our server to retrieve:
Both the SMS Everyone module and the Microsoft 365 email module will go green.
The filter in the middle will show 1
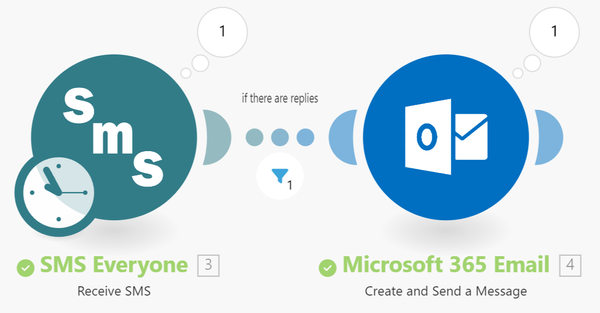
... and you (or whomever you made the recipient of the email) should get an email. If there are multiple SMS replies on our servers at the time, you'll receive an email for each SMS reply.
If anything turns red, click the thought bubble up top right of the module and look at the error message for how to solve the problem. If you cant solve the problem, contact us.
Retrieving SMS Delivery Status
After you have sent an SMS message in Make, you could update your records with the delivery status of a message.
Note that the carriers try in some instances for up to 48 hours to reach a phone, so this option below is really just for the majority of message that either deliver or fail within say 30 seconds.
The idea with this option is that we are sending the message, then waiting for about 30 seconds, then polling our API to fetch the delivery status from our servers... all without writing a single line of code. Lets give it a go.
STEP 1 - SET UP THE SENDING SMS PART
See above for setting up the Send SMS part.
STEP 2 - ADD A 30 SECOND DELAY
In Make, click on the + sign to the right of the SMS Everyone Send an SMS module.
In the search field, type the word 'sleep'
Then select the Sleep tool:

Set the delay time to 30 seconds and click save

STEP 3 - ADD THE SMS EVERYONE 'MAKE AN API CALL' MODULE
Click the + sign on the right of the sleep tool:

Search for 'SMS Everyone' and pick the 'Make an API call' module:

You'll see this box pop up:

Connection Field
Use your SMS Everyone username and password to connect to your account in the 'connection' section if it hasn't connected automatically.
URL Field
Here, type this below exactly as we have it here:
/DRStatus
Body Field
First type this:
{"CampaignId":
Then drag the CampaignId from the SMS Everyone Send an SMS module into the field to the right of what you've just typed like this:


Then, to the right of that CampaignId field you dragged in, type a single close squiggly bracket
}
So now it looks like this:

STEP 4 - TEST
You'll need the campaign ID of a message that has already been sent.
Open the settings for the 'Make an API call' module, click your mouse into the 'Body' field and write down the campaignID that you see here:

Right click the 'Make an API call' module and select 'Run this module only'

Enter the campaign ID you wrote down before and click OK.

It should show a success. Then it will show the OUTPUT bundle.
expand the "Body" until you find the 'Status' info

Delivery Receipt Status ID
DeliveryReceiptStatusId is the status of the message.
1 = DELIVERED
2 = FAILED
3 = REJECTED BY THE CARRIERS
Code
Code is the error code if the message failed.
If the message is delivered, the code will be 0.
For a list of all the codes, go to our REST API page under 'Delivery Error Codes'
You can then take that data and do whatever you like with it.
you could email it to yourself, update a Google Sheet, put it in a CRM etc etc.
If you have issues, getting this to work, contact us and we'll help you figure it out.
Other API Options
Subscribe someone to an SMS Everyone List
After you have got the delivery receipt, you could add another 'Make an API call' module that adds their number to a list in SMS Everyone.
In the URL field, use the Url Slug of
/crm
In the Body field, use this:
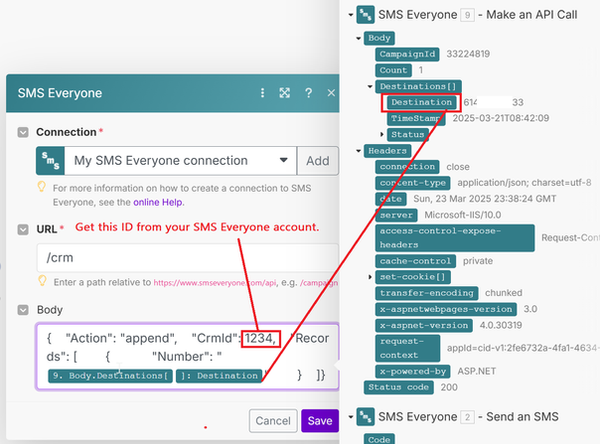
To Retrieve a CRMID
In SMS Everyone, hover your mouse over the List Name on the lists page.
it will show you the CRMID to use in the Body field.
Body JSON
{
"Action": "append",
"CrmId": PUT CRMID HERE,
"Records": [
{
"Number": "DRAG DESTINATION FROM PREVIOUS MODULE HERE"
}
]
}
If you don't have an SMS Everyone account, feel free to sign up for a free trial and we'll send you the required info. Be sure to mention that you want to connect to 'Make'